Tips for sharing music on Zoom
The Songwriting Sessions course meets on Zoom with special guest Peter Mulvey.
Zoom can be a great platform for sharing music, whether you’re teaching or taking a private lesson, joining a group class (like my Songwriting Sessions course), collaborating with another musician, or just playing a song for a friend. Here is a guide to setting up and getting the best sound.
Your setup
For the best results and the most control, use the Zoom desktop client rather than the mobile app.
Depending on your laptop, you may find that an external HD webcam like the Logitech C920 gives you better audio and video than the computer’s built-in mic and camera.
A smartphone can make an excellent webcam. If you use a Mac, Apple has made connecting an iPhone as a webcam (either wirelessly or with a USB cable) very easy with recent Mac OS and iOS versions, as described here. While the phone camera can provide high-quality video, you’ll likely want to use a better audio source (such as an external mic). You can mix and match video and audio sources in Zoom.
You can also use multiple cameras in Zoom. In online guitar lessons I often use my MacBook Air’s FaceTime camera for a full view showing my face and guitar, and my iPhone (on a small tripod) for a closeup of my hands on the guitar. In Zoom, I switch between cameras by changing the video source.
To upgrade your audio, use an external microphone that connects to your computer: a USB mic, for instance, or any other mic run through an audio interface. If you can connect a mic to your computer as an audio source, it will show up as a microphone option in Zoom. (If you happen to have a Zoom H2n Handy Recorder, check out this post on how you can use it as a USB mic.)
Especially if you’re using an external microphone, use headphones or earbuds instead of speakers to avoid feedback or echo issues.
Settings
Here are the key settings to optimize Zoom for music. You’ll only need to change most of these settings once, with the exception of choosing your microphone and speakers and enabling original sound—you have to set those every time you join a meeting.
First, start or join a Zoom meeting.
In the lower left corner of the Zoom window, click the carat next to the microphone icon, and choose Audio Settings.
In Audio Settings:
Choose your preferred microphone and speaker options, and sound-check them using the test buttons. In the screen below, I’ve set my speaker to my Jabra Move headphones, and the microphone to a Logitech C920 HD webcam (the headphones do have a microphone, but the webcam’s mic sounds much better).
Uncheck the box that says Automatically adjust microphone volume, so you can control the level yourself.
Set Suppress background noise to low to optimize for music, as suggested.
Click Advanced at the bottom of the window to open advanced settings.
In Advanced settings:
Check the box for Show in-meeting option to “Enable original sound” from microphone. By default, Zoom processes audio to make speech easier to hear, but that can distort music. Enabling original sound shuts off that processing.
If you have high-speed Internet, preferably a wired Ethernet connection rather than wifi, check the box for High fidelity music mode. If your connection isn’t fast enough, you’ll be better off not using high-fidelity mode.
Performing live
If you’re going to play music live with your camera and microphone, enable original sound. (By default, every time you open a meeting, original sound is disabled.)
To enable original sound: Move your cursor to the top left corner of the Zoom meeting window, and click Turn on original sound.
Sharing recorded music
Here’s how to share a recorded track or video, whether on your computer or online.
On your computer, open whatever you want to share—an app like iTunes or Spotify, a YouTube video, lyrics in a text document, etc.
In the Zoom meeting, click Share Screen at the bottom center of the window.
If you want to share audio only: on the Share Screen window, go to the Advanced tab and choose Music or computer sound only. Click share, and then go to your music player app and start the song. You’ll still be on camera in the meeting.
To share a window with sound, choose the window you want and check the box at bottom left for Share computer sound. (In this case, I’m sharing a Bandcamp page where I’ll play the song and people can read the lyrics.)
You can also share a window while playing audio from another source: choose the window you want to show and check the box for Share computer sound. In this case, I’m setting up to play a song from iTunes while showing the lyrics in a window.
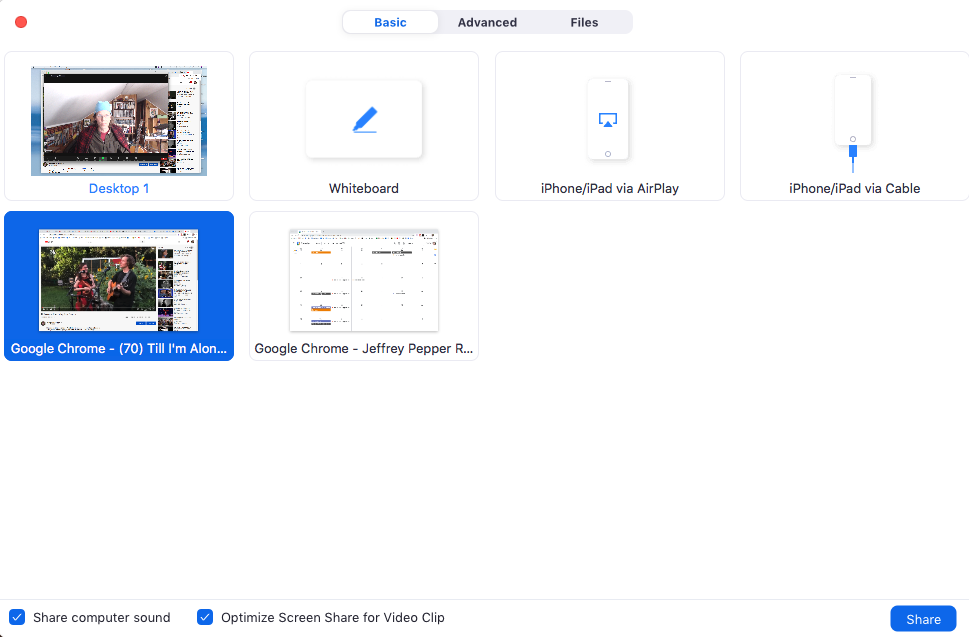
To share a video, choose the video window (here, on YouTube) and check the boxes for both Share computer sound and for Optimize screen share for video clip.
Sound-checking yourself
Test out your setup in Zoom using the video and audio settings screens, as described above.
To be extra sure of what you’ll look and sound like to others, record yourself briefly in Zoom (either in the cloud or on your computer). If you’re doing this by yourself, use your personal meeting room. Close out of the meeting and check out the file when it’s processed and ready.
Those are the basics. I hope you find this helpful next time you want to share music on Zoom.
JPR


